Whilst waiting for the installation of Exchange binaries on our third Exchange 2013 Proof of ConceptDAG node, I got thinking. It would be really nice to differentiate these servers in some way so that the operator knows what platform they’re working on. BGInfo would have been a way, but I wanted something bolder, more colorful, more ‘the interface formally known as Metro’.
There are 3 parts to this solution…
- Brebenel Eduard-Silviu’s Exchange 2013 logo available at DeviantArt
- Chris Stone’s custom ADM for setting Desktop Background Colour via GPO
- The Native User Profile Administrative Template for defining Desktop Background Image
Creating your wallpaper center piece
The first stage is to take Brebenel’s lovely icon, and convert it into a JPEG or BMP. You can do this by…
- Saving the PNG available from the DeviantArt website to you local computer
- Opening said file in Microsoft Paint/an imaging tool of your choice
- Selecting the ‘Save As’ , or equivalent function , to save the file as a JPEG or BMP
Some thoughts on this: The image is a heck of a lot smaller in JPEG and due to limited colour palette does not suffer for being compressed. If you’re distributing this over your network, why not save a few packets and go JPEG? Before the next stages, upload your JPEG/BMP to a network share that is ubiquitously accessible by ‘Authenticated Users’ on your Domain.
Administratively creating your ‘canvas’
The next stage is to apply a desktop background colour to lay the jpeg on top of. Windows Server Active Directory does not natively ship with any policies or preferences for setting desktop background colour. Enter please Chris Stone’s Policy Defintion :
CLASS USER
CATEGORY “Desktop”
CATEGORY “Custom”
KEYNAME “Control PanelColors”
POLICY “Background Color”
EXPLAIN “Allow you to control the background color of the user’s desktop.”
PART “Enter the RGB values of the user’s desktop background (ex: 128 128 128)” TEXT
END PART
PART “Color” EDITTEXT
REQUIRED
VALUENAME “Background”
END PART
END POLICY
END CATEGORY
END CATEGORY
- Save the code block above into a sensibly named file with the extension .ADM using your favourite text editor (e.g. notepad)
- Open The Group Policy Management administrative tool and create a new GPO linked to your target OU.
- Edit the new GPO by right clicking on it and selecting ‘Edit’.
- Expand out the following nodes: ‘User Configuration -> Policies’
- Right click on ‘Administrative Templates’ and select ‘Add/Remove Templates’
- Left click ‘Add’ then browse to your saved ADM file
- Expand out the following nodes: ‘User Configuration -> Policies -> Administrative Templates -> Classic Administrative Templates-> Desktop -> Custom’
- Enter the colour code ‘208 223 209′ into the Background Color’ setting. Inverted commas NOT required

That will set the Desktop Background Colour to be the same as Mr Eduard-Silvius’ icon, allowing us to…
Administratively applying your wallpaper
Remember where you uploaded your JPEG/BMP earlier? Good. Now you can set that image as your desktop wallpaper. From the same GPO editing snap-in:
- Expand the following nodes: ‘User Configuration ->Policies -> Administrative Templates -> Desktop -> Desktop’
- Set the ‘Desktop Wallpaper’ setting name value to the UNC path of your image file
- Set the ‘Wallpaper Style’ setting value to ‘Fit’, to maximize the icon’s size.
Note: You shouldn’t see any pixelation, as the icon/image starts life pretty darn wide (2124 pixels!)
Making it stick – setting Loopback Processing
To ensure that the background is applied for every user that logs onto the box, it is required to enable loopback processing for your GPO. This is because we are applying User Settings on the basis of machine logged onto, and User the Settings group policy object applied to it. To do this, again from the same Group Policy editing snap-in…
- Expand the following nodes: ‘Computer Configuration -> Policies -> Administrative Templates ->System -> Group Policy’
- Enable the ‘Configure user Group Policy loopback processing mode’ setting in ‘Merge’ mode.
- Close the Group Policy editor snap-in
This will apply your Desktop background GPO without removing other GPO’s applied to the user’s user object. If there is a conflict (e.g. they already have desktop background GPO’s applied) then the computer object’s user settings will take precedence.
Note: You cannot scope which settings are applied using this GPO, or restrict it’s application to certain machine types using WMI filtering as it relies on both Computer & User settings being applied to work!
Once the GPO has applied (you can force this using GPUPDATE /Force) you will find that when a user logs onto the machine they will have a gorgeous new wallpaper.
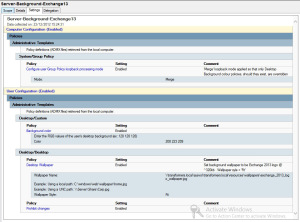
If you prefer reading your settings via Microsoft’s very own GPMC native ‘settings’ view, please find below a screenshot for your perusal
An enhancement on this would be using BGINFO.exe’s native wallpaper application/manipulation abilities. Look at Rich Vanover’s TechRepublic article here for more guidance on that approach.
If you’re after a simpler way of tattooing system data to a desktop, you could always try @richardjgreen‘s approach here which utilizes the older BACKINFO.exe binary. I’m not sure how you’d use BACKINFO to enforce tattooing with a given wallpaper file, something I know BGINFO can be configured to do with .BGI files, but I suspect Richard will elaborate at some point 
Thanks to all the guys I linked in this article. Great work from all of them be it forum contribution or artistic contribution. All I did was put it together 

Leave a Reply